
So, it appears that Apple® has changed their App validation process; fat binaries are no longer passing validation, and, per our support inbox, this is a very real and present problem for a lot of people.
Well, fear not! After some nifty hacking and finagling we have come up with a process that is simple and straight-forward, continues to support universality in development, and archives artifacts that pass validation.
If you implement this method, please, let us know about it in the comments, and, if it is working for you, be sure to flood your social media with links back to this article. No, this is not a shameless attempt to get traffic, though traffic sure is sweet. This is evidently a very real problem for many developers, and it is certain that if they are currently sitting at their keyboard, slamming their face into it because they can’t resolve this issue, they will be thankful you gave them a heads up!
Alright, enough bloviating. Here is a “step by step” of the new process.
Creating a Framework
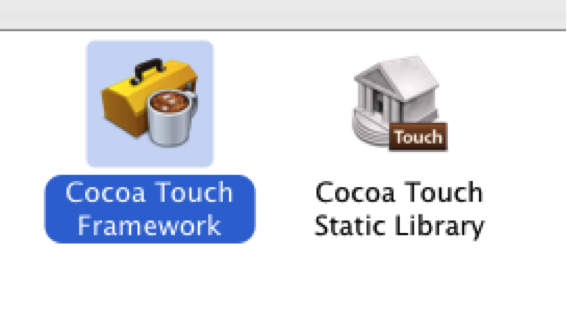
- Fire up Xcode and start a new Cocoa Touch Framework project (Fig. 1)
(Figure 1) - Go to the Build Settings of your project target and confirm or set the “Architectures” to “Standard Architectures.” These are arm64 and armv7, and are likely the default. (Fig. 2)
- Set “Build Active Architecture” to “NO” – Yes your build times may be a little longer, but this is what is going to allow your Frameworks to be “universal”. So, if you don’t do this, running on your sim will be a problem. Besides, if your builds are debilitatingly slow in a framework because you set “Build Active Architecture” to “NO,” you probably aren’t maximizing modularity. (Fig. 2)
- Set or confirm “Valid Architectures” to arm64, armv7 and armv7s. This is likely the default. (Fig. 2)
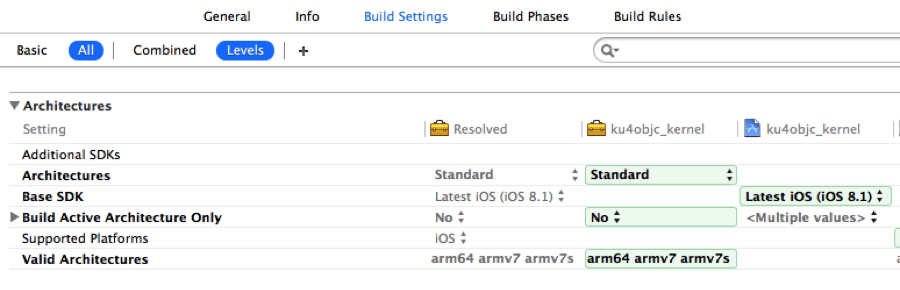
(Figure 2) -
Go to the Build Phases section of your project target and append a new Run Script phase. Paste this script in in it:UPDATE: Due to the latest version of Xcode changing its compilation process this script can no longer be placed in the Build Phases, as this causes the script to run too early, not giving the build process enough time to generate the module.modulemap files for your framework. If you previously used this process be sure to follow these new instructions for this step and remove the Build Phase Run Script that this step previously requested.
NEW INSTRUCTIONS: Add the script below to your project’s build Scheme as an Archive Post-action:
- Edit your projects build Scheme by selecting “Edit Scheme” from the Scheme drop down.
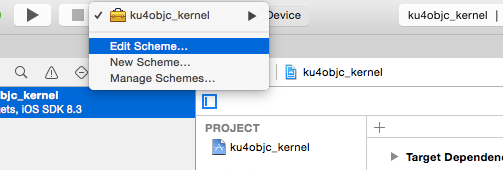
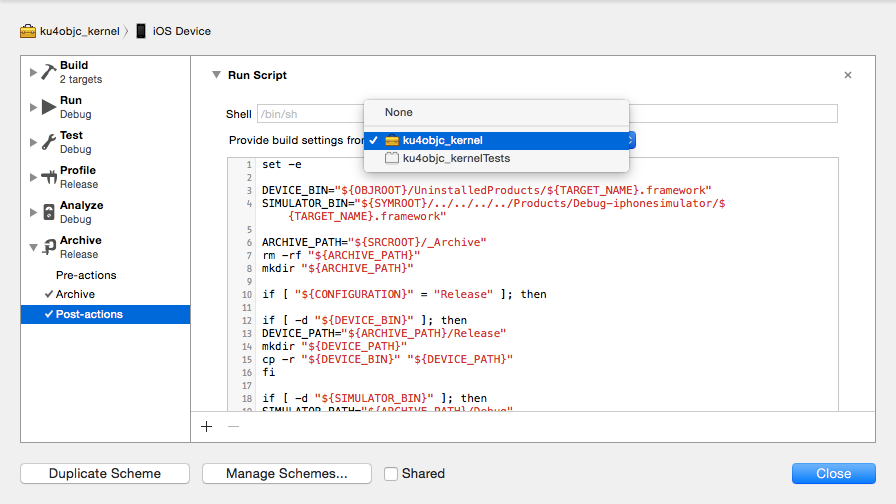
- Add the script below as an Archive Post-action, select your project from the “Provide build settings from” drop down, and click “Close.”
- Edit your projects build Scheme by selecting “Edit Scheme” from the Scheme drop down.


Archive Post-action script
set -e

DEVICE_BIN="${OBJROOT}/UninstalledProducts/${TARGET_NAME}.framework"
SIMULATOR_BIN="${SYMROOT}/../../../../Products/Debug-iphonesimulator/${TARGET_NAME}.framework"

ARCHIVE_PATH="${SRCROOT}/_Archive"
rm -rf "${ARCHIVE_PATH}"
mkdir "${ARCHIVE_PATH}"

if [ "${CONFIGURATION}" = "Release" ]; then

if [ -d "${DEVICE_BIN}" ]; then
DEVICE_PATH="${ARCHIVE_PATH}/Release"
mkdir "${DEVICE_PATH}"
cp -r "${DEVICE_BIN}" "${DEVICE_PATH}"
fi
if [ -d "${SIMULATOR_BIN}" ]; then
SIMULATOR_PATH="${ARCHIVE_PATH}/Debug"
mkdir "${SIMULATOR_PATH}"
cp -r "${DEVICE_BIN}" "${SIMULATOR_PATH}"
lipo -create "${DEVICE_BIN}/${TARGET_NAME}" "${SIMULATOR_BIN}/${TARGET_NAME}" -output "${SIMULATOR_PATH}/${TARGET_NAME}.framework/${TARGET_NAME}"

fi
fi
exit 0;
There you go. Now you will simply develop.
Assuming that you are using your simulators and devices to test regularly during development before archiving, you will not need to take special note of this, BUT do know that to get your framework artifact you will have to Archive your project. Doing so will add an _Archive/ directory (Fig. 3) to the root of your project in Finder in which you will find your artifact. Know that you will have to build the project with a simulator and archive with a device to get a universal. If someone out there wants to contribute an xcodebuild or xctool script to build both of these on the fly, please, feel free. It would be a great contribution and a welcome addition for may, I’m sure!

(An example of a working framework template can be found on here on kodmunki™ Github.)
That’s it! Now, you have a Framework. But, if you are anything like me, you have likely built a kernel or some other low level Framework and will expect other higher level Frameworks to depend on this Framework. Like, say, persistence, or data. To do this you will do the following:
Creating Dependent Frameworks
- Perform steps 1-6 from above to create the Framework.
- In the Build Settings of both the project Target and the test Target, set “Always Search User Paths” to “YES”. (Fig. 4)

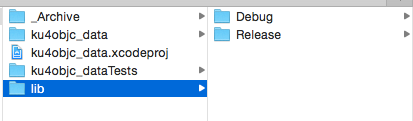
(Figure 4) - Add a /lib directory to your Framework that will contain all of your project’s custom Frameworks, i.e. kernel if this is data. (Fig. 5)
- Put the desired Framework artifacts in this directory. When done correctly, the /lib directory will contain a /Debug and a /Release directory each containing your binary dependencies. (Fig. 5)
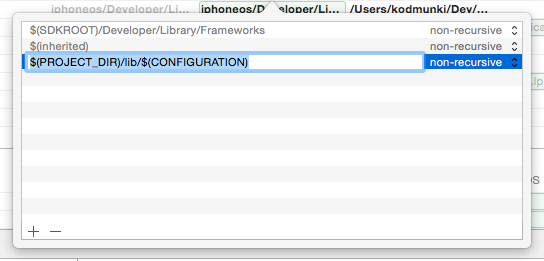
(Figure 5) - In the “Framework Search Paths” of both your project Target and your test Target add “$(PROJECT_DIR)/lib/$(CONFIGURATION)” (Fig. 6)
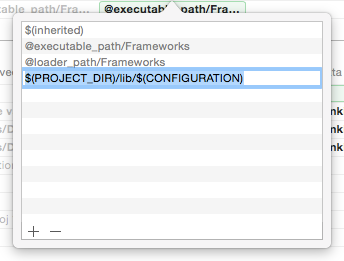
(Figure 6) - In the “Runpath Search Paths” of both your project Target and your test Target add the following paths: “$(inherited), @executable_path/Frameworks, @loader_path/Frameworks, $(PROJECT_DIR)/lib/$(CONFIGURATION)” (Fig. 7)
(Figure 7)


All should be working successfully! Run your unit tests, build with both the simulator and device, and archive your project to verify.
(An example of a working dependent framework template can be found on here on kodmunki™Github.)
Now you want to add this awesome modularity to an application you say? Okay, here’s how:
Adding Frameworks to an App
- Create a /lib directory at the project root that will contain the custom Frameworks that you want to add.
- Put the desired Framework artifacts in this directory. (Be sure to add both the Debug and Release bins at the directory level. This is just like in step #4 of the previous section)
- In the“Runpath Search Paths” and “Framework Search Paths” of your project target and test target add “$(PROJECT_DIR)/lib/$(CONFIGURATION)”
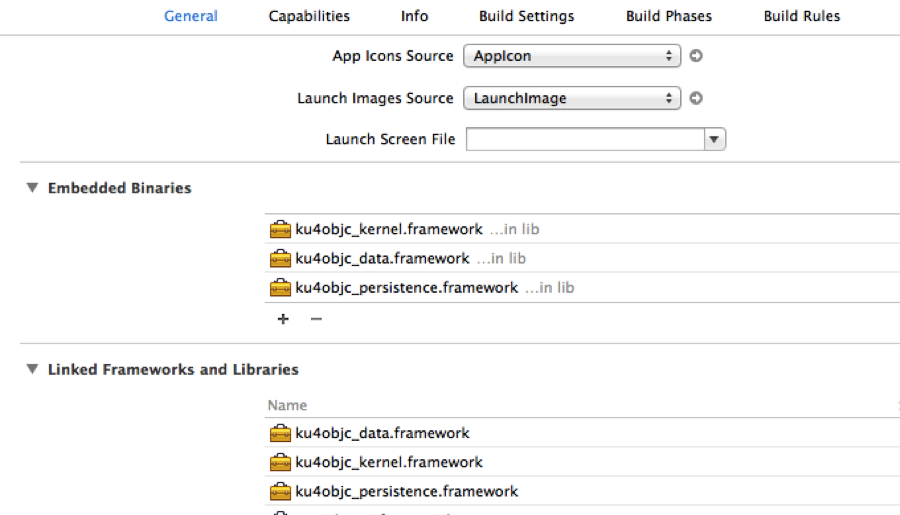
- Navigate to the General section of your project Target and add the desired Frameworks to the “Embedded Binaries” section. Add the binaries that are found in Release! The ones in Debug will not pass validation with Apple®! Note, that this should automatically add them to the “Linked Frameworks and Libraries” below. After this step, you should have see your Frameworks in both sections. (Fig. 9). Point of note: ensure that they aren’t duplicated in the “Linked Frameworks and Libraries” section!
(Figure 9)

(An example of a working application template can be found on here on kodmunki™ Github.)
Some worthwhile points of note:
- These instructions are for those projects that support Cocoa Touch Frameworks, i.e. iOS 8+. Efforts to use these instructions for prior versions, may not be futile, but are untested and will, likely, be in vain.
- If you would like to port an iOS Framework built using the “kstenerud/iOS-Universal-Framework” to a Cocoa Touch Framework, I recommend you do the following: just start a new Cocoa Touch Framework, follow the steps that I have outlined here, copy and paste the files from your old project into your new project directory tree, and add them to the project. To answer a question some of you might have, yes, you could just change the settings, phases, and scripts of your current project, but I do not condone or recommend this, as you are certain to lose hours or days of your life fiddling with settings and scouring the ends of the earth for some obscure missed step. That said; if you decide to go this route, please, do notemail me with issues. I don’t recommend it, and I will not offer support for it. — Well, free support anyway … paid, hourly support, maybe :{)}
- Xcode is horrifically finicky, skittish, and unpredictable. I have tested this method with numerous libraries and have had nothing but success. Though, I must say, I have run into compiler errors and warnings from time to time for no good reason, whatsoever. That said, please be sure to try cleaning your project, clearing your derived data, re-running your build steps, and doing any of the other “regular” Xcode cleans before assuming this doesn’t work. I absolutely hate having to make this disclaimer, but if you have any experience with Xcode you, too, know this sad but inevitable truth.
There you have it. Modularity revived in Xcode 6 the remix! This should work now just as it did in the previous article on this topic. Though, now, the processes passes Apple® validation when attempting to deploy your App to the app store! :{)}
I hope that you enjoyed this post and find it useful! And, if you do, you share it with others.
Please, comment on and share this post with others if you enjoy it; follow @kodmunki on Twitter for regular updates on new developments, deployments, articles, and tools; and check out kodmunki™ on github for cool, managed, and tested kodmunki™ projects.
Happy hacking! :{)}
以下转载自:
http://foggry.com/blog/2014/06/12/wwdc2014zhi-iosshi-yong-dong-tai-ku/
WWDC2014之iOS使用动态库
苹果的开放态度
WWDC2014上发布的Xcode6 beta版有了不少更新,其中令我惊讶的一个是苹果在iOS上开放了动态库,在Xcode6 Beta版的更新文档中是这样描述的:
Frameworks for iOS. iOS developers can now create dynamic frameworks. Frameworks are a collection of code and resources to encapsulate functionality that is valuable across multiple projects. Frameworks work perfectly with extensions, sharing logic that can be used by both the main application, and the bundled extensions.
详情见官方文档New Features in Xcode 6 Beta。
framework是Cocoa/Cocoa Touch程序中使用的一种资源打包方式,可以将将代码文件、头文件、资源文件、说明文档等集中在一起,方便开发者使用,作为一名Cocoa/Cocoa Touch程序员每天都要跟各种各样的Framework打交道。Cocoa/Cocoa Touch开发框架本身提供了大量的Framework,比如Foundation.framework/UIKit.framework/AppKit.framework等。需要注意的是,这些framework无一例外都是动态库。
但残忍的是,Cocoa Touch上并不允许我们使用自己创建的framework。不过由于framework是一种优秀的资源打包方式,拥有无穷智慧的程序员们便想出了以framework的形式打包静态库的招数,因此我们平时看到的第三方发布的framework无一例外都是静态库,真正的动态库是上不了AppStore的。
WWDC2014给我的一个很大感触是苹果对iOS的开放态度:允许使用动态库、允许第三方键盘、App Extension等等,这些在之前是想都不敢想的事。
iOS上动态库可以做什么
和静态库在编译时和app代码链接并打进同一个二进制包中不同,动态库可以在运行时手动加载,这样就可以做很多事情,比如:
- 应用插件化
目前很多应用功能越做越多,软件显得越来越臃肿。因此插件化就成了很多软件发展的必经之路,比如支付宝这种平台级别的软件:

首页上密密麻麻的功能,而且还在增多,照这个趋势发展下去,软件包的大小将会不可想象。目前常用的解决方案是使用web页面,但用户体验和Native界面是没法比的。
设想,如果每一个功能点都是一个动态库,在用户想使用某个功能的时候让其从网络下载,然后手动加载动态库,实现功能的的插件化,就再也不用担心功能点的无限增多了,这该是件多么美好的事!
- 软件版本实时模块升级
还在忍受苹果动辄一周,甚至更长的审核周期吗?有了动态库妈妈就再也不用担心你的软件升级了!
如果软件中的某个功能点出现了严重的bug,或者想在其中新增功能,你的这个功能点又是通过动态库实现的,这时候你只需要在适当的时候从服务器上将新版本的动态库文件下载到本地,然后在用户重启应用的时候即可实现新功能的展现。
- 共享可执行文件
在其它大部分平台上,动态库都可以用于不同应用间共享,这就大大节省了内存。从目前来看,iOS仍然不允许进程间共享动态库,即iOS上的动态库只能是私有的,因为我们仍然不能将动态库文件放置在除了自身沙盒以外的其它任何地方。
不过iOS8上开放了App Extension功能,可以为一个应用创建插件,这样主app和插件之间共享动态库还是可行的。
PS: 上述关于动态库在iOS平台的使用,在技术上都是可行的,但本人并没有真正尝试过做出一个上线AppStore的应用,因此并不保证按照上述方式使用动态库一定能通过苹果审核!
2014-6-23修正:
经@唐巧_boy提醒,sandbox会验证动态库的签名,所以如果是动态从服务器更新的动态库,应该是签名不了的,因此应用插件化、软件版本实时模块升级估计很难实现,一切都只能等到iOS8正式版发布以后再验证了。感谢@唐巧_boy!
创建动态库
1、创建动态库
- 创建工程文件
在下图所示界面能够找到Cocoa Touch动态库的创建入口:

跟随指引一步步操作即可创建一个新的动态库工程,我的工程名字叫Dylib,Xcode会同时创建一个和工程target同名的.h文件,比如我的就是Dylib.h。
- 向工程中添加文件
接下来就可以在工程中随意添加文件了。我在其中新建了一个名为Person的测试类,提供的接口如下:
1 2 3 4 5 |
|
对应的实现部分:
1 2 3 4 5 6 7 8 9 10 11 |
|
- 设置开放的头文件
一个库里面可以后很多的代码,但是我们需要设置能够提供给外界使用的接口,可以通过Target—>Build Phases—>Headers来设置,如下图所示:

我们只需将希望开放的头文件放到Public列表中即可,比如我开放了Dylib.h和Person.h两个头文件,在生成的framework的Header目录下就可以看到这两个头文件,如下图所示:

一切完成,Run以后就能成功生成framework文件了。
2、通用动态库
经过第一步我们只是创建了一个动态库文件,但是和静态库类似,该动态库并同时不支持真机和模拟器,可以通过以下步骤创建通用动态库:
- 创建Aggregate Target
按下图所示,在动态库工程中添加一个类型为Aggregate的target:

按提示一步步操作即可,我给Aggregate的Target的命名是CommonDylib。
- 设置Target Dependencies
按以下路径设置CommonDylib对应的Target Dependencies:
1 |
|
将真正的动态库Dylib Target添加到其中。
- 添加Run Script
按以下路径为CommonDylib添加Run Script:
1 |
|
添加的脚本为:
1 2 3 4 5 6 7 8 9 10 11 12 13 14 15 16 17 18 19 20 21 22 23 24 25 26 27 28 29 30 31 |
|
添加以后的效果如图所示:

该脚本是我根据一篇文章中介绍的脚本改写的,感谢原文作者。
脚本的主要功能是:
1.分别编译生成真机和模拟器使用的framework; 2.使用lipo命令将其合并成一个通用framework; 3.最后将生成的通用framework放置在工程根目录下新建的Products目录下。
如果一切顺利,对CommonDylib target执行run操作以后就能生成一个如图所示的通用framework文件了:

使用动态库
添加动态库到工程文件
经过以上步骤的努力,生成了最终需要的framework文件,为了演示动态库的使用,新建了一个名为FrameworkDemo的工程。通过以下方式将刚生成的framework添加到工程中:
1 |
|
同时设置将framework作为资源文件拷贝到Bundle中:
1 |
|
如图所示:

仅仅这样做是不够的,还需要为动态库添加链接依赖。
自动链接动态库
添加完动态库后,如果希望动态库在软件启动时自动链接,可以通过以下方式设置动态库依赖路径:
1 |
|
由于向工程中添加动态库时,将动态库设置了Copy Bundle Resources,因此就可以将Runpath Search Paths路径依赖设置为main bundle,即沙盒中的FrameworkDemo.app目录,向Runpath Search Paths中添加下述内容:
1 |
|
如图所示:

其中的@executable_path/表示可执行文件所在路径,即沙盒中的.app目录,注意不要漏掉最后的/。
如果你将动态库放到了沙盒中的其他目录,只需要添加对应路径的依赖就可以了。
需要的时候链接动态库
动态库的另一个重要特性就是即插即用性,我们可以选择在需要的时候再加载动态库。
- 更改设置
如果不希望在软件一启动就加载动态库,需要将
1 |
|
中Dylib.framework对应的Status由默认的Required改成Optional;或者更干脆的,将Dylib.framework从Link Binary With Libraries列表中删除即可。
- 使用dlopen加载动态库
以Dylib.framework为例,动态库中真正的可执行代码为Dylib.framework/Dylib文件,因此使用dlopen时如果仅仅指定加载动态库的路径为Dylib.framework是没法成功加载的。
示例代码如下:
1 2 3 4 5 6 7 8 9 10 11 12 13 14 15 16 17 |
|
以dlopen方式使用动态库不知道是否能通过苹果审核。
- 使用NSBundle加载动态库
也可以使用NSBundle来加载动态库,实现代码如下:
1 2 3 4 5 6 7 8 9 10 11 12 13 14 15 16 17 |
|
使用动态库中代码
通过上述任一一种方式加载的动态库后,就可以使用动态库中的代码文件了,以Dylib.framework中的Person类的使用为例:
1 2 3 4 5 6 7 8 |
|
注意,如果直接通过下属方式初始化Person类是不成功的:
1 2 3 4 5 6 7 |
|
监测动态库的加载和移除
我们可以通过下述方式,为动态库的加载和移除添加监听回调:
1 2 3 4 5 |
|
github上有一个完整的示例代码,
从这里看出,原来就算空白工程软件启动的时候也会加载多达一百二十多个动态库,如果这些都是静态库,那该有多可怕!!
Demo
本文使用的例子已经上传到github上,需要的朋友请自取。
另外,本文对某些东西可能有理解错误的地方,还请指出。
参考文档:


相关推荐
NULL 博文链接:https://justsee.iteye.com/blog/2285574
自己亲手写了一个制作framework静态库的demo,简单易懂,把自己的经常使用到的代码封装成静态库,使用方便还可以防止别人偷窃自己的代码。很实用。
ios创建和使用framework,模拟器和真机实测
ios 动态库 代码注入(Framework)
IOS 热更新,实时代码更新,动态更新,动态库framework http://blog.csdn.net/jianrenbubai/article/details/50351507
IOS创建静态Framework模板,执行后会在xcode生成静态framework模板 因为动态framework的生成需要IOS8.0以上的系统才能支持,否则不能上架,所以在支持IOS7.0或者以下的代码的时候需要使用静态framework 1.确保...
最新编译iOS,swift IJKMediaFramework.framework,ffmpeg4.0,支持https,支持多种格式h264,h265,RTSP,重播不暂停卡流,真实可用
ios使用cmake编译framework的整套模板,包括toolchain工具链iOS.cmake,CMakeLists.txt,Info.plist和ShellScript脚本
This short work begins by reviewing the primary principals of machine learning and then moves on to discussing more advanced topics, such as CoreML, the framework used to enable machine learning ...
iOS界面app只可加载静态库,但server程序可以加载动态库。例子中含一简单实例,含Makefile。
iOS Universal Framework ,iOS Universal Framework Mk 7 是 Xcode 4 的项目模板用来构建通用...
ios 动态添加按钮,ios,为什么要写这么多字
IOS静态库和Framework区别 一、什么是库? 库是共享程序代码的方式,一般分为静态库和动态库。 二、静态库与动态库的...系统的.framework是动态库,我们自己建立的.framework是静态库。 六、a与.framework有什么区
iOS常用宏定义和常用类别方法的framework包.
详情请参看 http://blog.csdn.net/hursing/article/details/8688861
opencv-4.6.0-ios-framework.zip
有关IOS移动开发中FRAMEWORK相关考题
XD ios 11的元件库XD ios 11的元件库XD ios 11的元件库XD ios 11的元件库XD ios 11的元件库